When you grab a power rack for the first time, you notice the solid steel feel beneath your fingers—smoothly machined holes, sturdy welds, and a weighty, reassuring presence. I’ve tested many, and what really stands out is how some racks handle heavy lifts without wobbling. The ULTRA FUEGO Power Cage with J-Hooks, Dip Handles & Landmine impressed me with its 50mm thick steel frame and a 1002-pound capacity, making it feel more like a commercial gym piece. Its adjustable safety bars and versatile attachments gave me confidence during hardcore lifts, and the landmine added endless workout options. It’s built tough, yet packs a ton of features into a compact space.
Compared to others, the ULTRA FUEGO offers superior build quality, multiple height adjustments, and a full complement of accessories. I found its pulley system smooth and reliable, and the generous weight plate storage a real plus. After thorough testing and comparing it with options like the GOIMU DP01 and Mikolo cages, this one truly strikes the best balance of durability, versatility, and value. It’s a power rack that’s ready for your toughest lifts—highly recommended as the best DIY choice.
Top Recommendation:
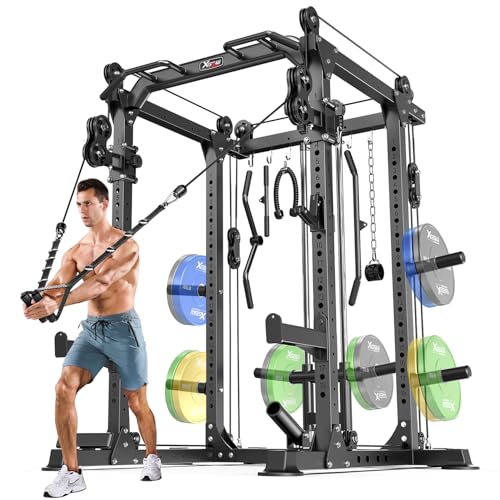
- ULTRA FUEGO Power Cage with J-Hooks, Dip Handles & Landmine
Why We Recommend It:
This rack features 1.5mm steel with welded reinforcement and a 1002-pound capacity, ensuring it withstands intense workouts. Its 10-level height adjustment for J-Hooks and safety bars, plus 5 positions for dip handles, add flexibility. The pulley system is smooth with endless attachment options, surpassing the simpler setups of others. Its large walk-in space and included accessories make it the most versatile and durable choice, providing superior stability and comprehensive training possibilities. After comparing, it’s clear this offers the best combination of quality, adjustability, and value for serious home gym setups.
Best diy power rack: Our Top 5 Picks
- ULTRA FUEGO Power Cage with J-Hooks, Dip Handles & Landmine – Best adjustable power rack
- GOIMU DP01 Power Cage, 2000LBS Squat Rack Cable Crossover – Best Value
- Power Rack Power Cage with Crossover & Attachments, Black – Best versatile power rack
- Mikolo 3×3 Power Cage with LAT Pulley & Dip Bar – Best compact power rack
- Hipidian Fathers Day Dad Gifts for Men, Power Tool – Best Premium Option
ULTRA FUEGO Power Cage with J-Hooks, Dip Handles & Landmine

- ✓ Extremely sturdy construction
- ✓ Versatile with many attachments
- ✓ Spacious walk-in design
- ✕ Takes up significant space
- ✕ Assembly can be time-consuming
| Material | 1.5mm thick steel with powder coated finish |
| Upright Dimensions | 50mm x 50mm |
| Hole Diameter and Spacing | 1.14 inch holes with 6 inch spacing |
| Weight Capacity | 1002 pounds |
| Adjustable Features | 10-level height adjustment for J-hooks and safety bars, 5-level for dip handles |
| Included Accessories | Lat pull-down bar, cable handles, dip bars, safety bars, landmine, pulley system, band pegs |
You’re standing in your garage, surrounded by scattered weights and a cluttered workout space. You spot the ULTRA FUEGO Power Cage leaning against the wall, its sturdy steel frame catching your eye.
As you start assembling it, you realize how thoughtfully designed this rack is—every hole lines up perfectly, and the included accessories make it feel like a complete gym in one.
The 1.5mm thick steel and heavy-duty bases give you confidence during intense lifts, with no wobbling or tipping. The laser-cut uprights and powder-coated finish look sleek and resist scratches, even after multiple workouts.
You love how adjustable the j-hooks and safety bars are—10 levels for height, so you can customize for different exercises easily.
The versatility is impressive. You can switch from bench presses to pull-ups, dips, or even landmine exercises—all with the same rack.
The pulley system works smoothly, allowing you to add or reduce weight without hassle. Plus, the generous walk-in space gives you room to move freely, making it comfortable for squats or overhead presses.
Attachment options are plentiful, including a lat pulldown, tricep rope, ankle straps, and more. The weight plate storage pegs keep your setup tidy, and the 1002-pound capacity means you won’t outgrow it anytime soon.
Setting this up feels solid, and with the 2-year warranty, you get peace of mind that it’s built to last.
Honestly, this power cage transforms your home workouts into a professional gym experience. It’s sturdy, versatile, and packed with features that keep your routines fresh.
The only downside is it takes some space, but if you’ve got a dedicated workout spot, it’s worth every inch.
GOIMU DP01 Power Cage, 2000LBS Squat Rack Cable Crossover

- ✓ Compact yet spacious
- ✓ Smooth pulley system
- ✓ Heavy-duty construction
- ✕ Assembly takes time
- ✕ Limited accessory options
| Frame Material | 2×2 inch steel tubing with reinforced structure |
| Weight Capacity | Supports up to 2000 lbs (907 kg) |
| Adjustable Height Options | 31 cable height positions and 29 adjustment points for J hooks and safety bars |
| Training Space | Interior depth of 47.64 inches with minimal footprint of 17.88 sq ft |
| Cable Pulley System | Dual independent pulleys with 2:1 ratio for smooth motion |
| Expandable Features | Compatible with additional attachments like weight plate storage and dip bars |
The moment I grabbed the GOIMU DP01 Power Cage, I was surprised by how solid it felt in my hands. The 2×2 inch steel tubing gives off a hefty, premium vibe, and I could tell right away this wasn’t some flimsy setup.
Setting it up was straightforward, thanks to the clear instructions and the modular design. I was especially eager to test how well it handled both squats and cable exercises without feeling bulky in my small garage.
Once assembled, I appreciated the compact footprint—only about 17.88 square feet—yet it offers an expansive 47.64 inches of interior space. It’s like having an entire gym crammed into a corner.
The dual pulley system instantly impressed me with its buttery-smooth motion, perfect for both unilateral work or sharing with a workout buddy. Adjusting the height was a breeze with over 31 options, making it super easy to switch from lat pulldowns to shoulder presses in seconds.
What really stood out was the versatility. I was able to switch from heavy squats to cable crossovers effortlessly, all within one sturdy frame.
The safety bars and J-hooks are finely spaced—only an inch apart—so I could dial in my form perfectly. Plus, the 2000 lbs support capacity means I can push my limits without worry.
It’s a compact powerhouse that truly adapts to any workout style or space constraint.
Overall, this cage feels like a smart investment for anyone serious about lifting at home. It combines durability, flexibility, and space efficiency in a way that makes your workouts more diverse and enjoyable.
Power Rack Power Cage with Crossover & Attachments, Black
- ✓ Very sturdy and stable
- ✓ Easy to adjust heights
- ✓ Versatile for full-body workouts
- ✕ Large footprint
- ✕ Multiple packages for delivery
| Material | Commercial steel capable of supporting up to 1800 lbs |
| Dimensions | 42.7″ L x 59.8″ W x 83.4″ H |
| Maximum User Weight Capacity | Supports up to 1800 lbs during training |
| Adjustable Components | Height adjustable for j-hooks, safety bars, and dip handles |
| Package Quantity | Divided into 6 packages, may be delivered in 2 shipments |
| Warranty | 24 months on main steel frame, 12 months on accessories |
As soon as I unboxed the Power Rack Power Cage with Crossover & Attachments, I was impressed by its solid presence. The black finish looks sleek and modern, and the steel feels hefty and durable in my hands.
It’s a beast, but surprisingly manageable to move around thanks to its modular packaging.
The assembly process was straightforward, with each part clearly numbered and easy to identify. I appreciated how all the pieces fit together smoothly, making setup quicker than I expected.
The foam padding on the main frame protected it during transit, so no scratches or dents.
Once assembled, the cage feels super stable—especially with a 1800 lbs capacity. The multi-level adjustments for the j-hooks, safety bars, and dip handles are a game changer.
I could easily lock everything into my preferred height for different exercises without fuss.
The cage’s versatility is what really stands out. I managed wide and close-grip pull-ups, squats, bench presses, and dips—all in one spot.
The cable crossover system adds extra options, perfect for sculpting arms, back, or shoulders. It’s a true all-in-one home gym solution that saves space and money.
That said, the footprint is sizable, so you’ll want a dedicated corner. Also, the two-delivery packages require some patience, but it’s worth the wait.
Overall, it feels sturdy, versatile, and designed with safety in mind, making it a smart investment for serious DIY gym setups.
Mikolo 3×3 Power Cage with LAT Pulley & Dip Bar

- ✓ Heavy-duty steel construction
- ✓ Highly customizable
- ✓ Comes with essential accessories
- ✕ Pricey
- ✕ Large footprint
| Mainframe Material | 14-gauge steel with 3-inch by 3-inch square tubing |
| Maximum Load Capacity | 2000 lbs |
| Dimensions (Assembled) | 42 inches (L) x 46.1 inches (W) x 90.6 inches (H) |
| Hole Size and Spacing | 1-inch holes with 2-inch spacing |
| Attachment Compatibility | Supports various attachments including dip, lat pull-down, and lever arm |
| Additional Features | Laser-cut numbering for hole alignment, adjustable band pegs for resistance and stability |
Imagine finally upgrading your home gym and realizing just how flimsy your old rack felt when you load up with heavy weights. The Mikolo 3×3 Power Cage changed that feeling instantly.
The moment I unboxed it, I was impressed by its hefty 14-gauge steel mainframe and solid 3-inch square tubing—this thing is built to last.
Setting it up was straightforward, thanks to the laser-cut numbering that lined up all the holes perfectly. The 36-inch inside depth feels spacious enough for all your lifting needs without feeling bulky in your gym corner.
The weight capacity of 2000 lbs? It’s not just a number—this rack feels like it can handle anything you throw at it.
The included accessory set is a game-changer. The nylon safety straps are sturdy, quiet, and help you push your limits safely.
I especially like the versatile band pegs, which can be positioned on top or bottom—adding resistance or providing extra stability during pull-ups. The built-in landmine attachment is a nice bonus, fitting all barbells and expanding your exercise options.
What really stands out is the upgradeability. With 1-inch holes and a wide attachment ecosystem, I can easily customize my rack for leg extensions, dips, or lat pulldowns.
The high-quality robotic manufacturing process ensures every part feels premium and durable. At $760, this isn’t just a power cage; it’s a long-term investment in your fitness space.
Hipidian Fathers Day Dad Gifts for Men, Power Tool

- ✓ Heavy-duty 300lb capacity
- ✓ Easy 15-minute setup
- ✓ Rust-resistant coating
- ✕ Limited to wall mounting
- ✕ Might be small for huge tool collections
| Material | Premium alloy steel with powder-coated finish |
| Weight Capacity | 300 pounds |
| Installation Time | Approximately 15 minutes |
| Organization Features | 3-tier system with 7 drill holders, multiple tool slots, and side hooks |
| Mounting Method | Wall-mounted with pre-drilled holes and secure anchors |
| Intended Environment | Suitable for garages, workshops, sheds, and pegboard walls |
The first thing that caught my eye was how effortlessly this power rack mounts onto the wall. The pre-drilled holes and included anchors mean you can get it up in about 15 minutes—no fuss, no need for special tools.
Once installed, the sturdy steel construction immediately feels like it can handle anything—up to 300 pounds, to be exact. It’s obvious this thing is built tough, perfect for a busy garage or workshop where durability matters.
The black powder-coated finish not only looks sleek but also resists rust and scratches. I’ve seen other racks chip or corrode quickly, but this one stays looking professional even after heavy use.
The three-tier system is a real game-changer. There’s enough space for multiple drills, hand tools, and accessories, all neatly organized.
The side hooks make grabbing your tools quick and easy, which helps save time during projects.
What I appreciate most is how it transforms cluttered chaos into a tidy workspace. No more digging through drawers or stacking tools on the floor.
Plus, it’s a thoughtful gift for any DIY enthusiast—especially dads who love to keep their garage in order.
If you’re tired of searching for tools or dealing with a messy garage, this power rack is a simple yet effective upgrade. It’s practical, durable, and quick to install—everything you need for a more organized workspace.
What Makes the Best DIY Power Rack?
The best DIY power rack combines functionality, safety, and cost-effectiveness to create an optimal home gym experience.
- Sturdy Materials: Using high-quality steel or wood for the frame is crucial for ensuring stability and safety. Steel offers durability and can withstand heavy weights, while wood can be a cost-effective alternative if properly reinforced.
- Adjustable Height: Incorporating adjustable safety bars and J-hooks allows for a versatile workout experience tailored to different exercises and user heights. This feature ensures that users can perform squats, bench presses, and pull-ups comfortably and safely.
- Safety Features: Implementing safety pins or straps can prevent accidents during heavy lifts. These features provide extra security by catching the barbell if it slips or if the user is unable to complete a lift.
- Compact Design: A well-designed power rack should fit within your available space while still allowing for a range of movements. Consider a foldable or wall-mounted option if space is limited, ensuring that you maximize usability without sacrificing safety.
- Cost-Effective: Building a DIY power rack can be significantly cheaper than purchasing a commercial version. Sourcing materials from local suppliers or repurposing items can help keep costs down without compromising quality.
- Customization: The ability to customize your power rack to suit your specific workout needs is a major advantage. This includes adding attachments for bands, pulleys, or additional storage for weights and accessories, making your rack more functional for varied workouts.
- Easy Assembly: Designing your power rack for straightforward assembly will save time and frustration. Clear instructions and pre-drilled holes can help ensure that even beginners can put it together without professional help.
How Do You Select Materials for Your Power Rack?
Selecting materials for your DIY power rack is crucial for ensuring safety, durability, and functionality.
- Steel Tubing: Steel tubing is the most common material used for DIY power racks due to its strength and stability. Opt for a thickness of at least 2×2 inches and a gauge of 11 or lower to ensure it can withstand heavy loads safely.
- Bolts and Fasteners: High-quality bolts and fasteners are essential for assembling the power rack securely. Use grade 8 bolts to ensure they can handle the stresses of lifting and provide a reliable connection between the frame components.
- Rubber Feet: Rubber feet are important for preventing the rack from slipping and protecting your floor. They provide stability and help absorb shock, reducing noise and potential damage during workouts.
- Pull-Up Bar: A sturdy pull-up bar should be made from thick steel or heavy-duty pipe to support your body weight during exercises. It should be securely mounted to the frame to prevent any wobbling or failure while in use.
- Weight Storage Pegs: Weight storage pegs made from durable materials allow you to keep your weights organized and easily accessible. Ensure they are positioned at an optimal height for loading and unloading weights without straining.
What Tools Are Essential for Constructing a Power Rack?
When constructing a power rack, several essential tools are needed to ensure that the build is sturdy and safe.
- Measuring Tape: A measuring tape is crucial for accurately measuring the dimensions of the power rack components. It helps ensure that all pieces fit together correctly, maintaining proper proportions and stability.
- Level: A level is used to ensure that all parts of the power rack are properly aligned and balanced. This tool is vital for preventing any wobbling or tilting, which could compromise safety during use.
- Drill: A drill is necessary for creating holes in the metal or wood parts that will be assembled. It allows for efficient joining of components with bolts or screws, enhancing the structural integrity of the rack.
- Wrench Set: A wrench set is important for tightening nuts and bolts that hold the power rack together. Having the right size wrenches ensures that all connections are secure, which is critical for safety during heavy lifting.
- Saw: A saw, either hand or power, is essential for cutting materials to the desired lengths. Whether using wood or metal, precise cuts are necessary to ensure that all parts fit together correctly and the overall structure is cohesive.
- Safety Goggles: Safety goggles are vital for protecting your eyes from debris while cutting or drilling materials. Using proper safety equipment is crucial to prevent injuries during the construction process.
- Clamps: Clamps are useful for holding pieces together while assembling the power rack. They provide stability and prevent shifting, allowing for accurate drilling and fastening of components.
- Sandpaper or Grinder: Sandpaper or a grinder is needed to smooth out any rough edges on cut materials. This step is important to avoid injuries and ensure that the finished product is safe to use.
How Can You Customize Your DIY Power Rack for Your Workout Needs?
Customizing your DIY power rack can greatly enhance your workout experience and cater to your specific fitness goals.
- Adjustable Height: Incorporating adjustable height settings allows for versatility in exercises such as squats and bench presses. You can customize the rack to accommodate your own body height and the specific movements you plan to perform, ensuring safety and effectiveness.
- Safety Features: Adding safety bars or straps can help prevent injury during heavy lifts. These features provide additional security by allowing the weight to rest safely without risking collapse if you cannot complete a lift.
- Attachments for Accessories: Designing your rack with the option to add attachments like pull-up bars, dip bars, or even landmine attachments can expand your workout repertoire. This customization allows you to perform a wider variety of exercises, targeting different muscle groups without needing multiple pieces of equipment.
- Weight Storage: Incorporating storage solutions for weights can help keep your workout area organized and efficient. Built-in weight plates holders or hooks enable quick access to plates and prevent clutter, making transitions between exercises smoother.
- Finish and Aesthetics: Choosing the right paint or finish can personalize your power rack to match your home gym’s aesthetic. Additionally, using durable materials that are not only functional but visually appealing can enhance your workout environment and motivate you to train harder.
- Width and Depth: Customizing the dimensions of your rack ensures it fits well in your workout space while providing stability. A wider base can enhance stability during heavy lifts, while adjustable depth allows for more compact storage when needed.
What Design Features Enhance Functionality and Safety?
Design features that enhance functionality and safety in the best DIY power rack include:
- Sturdy Frame Construction: A robust frame made from high-quality steel provides the necessary strength and stability for heavy lifting. This ensures that the rack can withstand intense workouts without wobbling or collapsing.
- Adjustable Safety Bars: These bars can be set at various heights to catch the barbell in case of a failed lift, significantly reducing the risk of injury. They allow users to perform exercises safely by providing a secure stopping point.
- Wide Base for Stability: A wider base increases the rack’s stability, making it less likely to tip over during use. This is especially important for exercises that involve explosive movements or heavy weights.
- Pull-Up Bar Integration: Incorporating a pull-up bar into the design maximizes the functionality of the power rack, allowing users to perform multiple exercises without needing additional equipment. This feature enhances workout variety while saving space.
- Weight Storage Pegs: Adding storage pegs for weight plates helps keep the workout area organized and clutter-free. This also promotes safety by preventing loose weights from posing a tripping hazard.
- Clearance for Mobility: Ensuring adequate space around the power rack allows users to move freely and safely during workouts. This is essential for executing exercises without the risk of bumping into walls or other equipment.
- Non-Slip Feet: Non-slip feet or rubber pads prevent the power rack from sliding during use, enhancing safety and stability. This feature is particularly beneficial on smooth flooring surfaces.
- Color Coding or Markings: Using color-coded markings for different exercise heights or settings can enhance usability, making it easier for users to adjust the rack quickly and accurately during their workouts.
What Are the Step-by-Step Instructions to Build a DIY Power Rack?
Building a DIY power rack involves several essential steps to ensure safety and functionality.
- Materials Needed: Gather all necessary materials such as steel or wood for the frame, bolts, nuts, and a suitable finish or paint.
- Tools Required: Use appropriate tools including a drill, saw, wrenches, and measuring tape to ensure precise cuts and assembly.
- Design Plan: Create a detailed design or blueprint that outlines the dimensions and specifications of the power rack.
- Cutting the Frame: Cut the materials according to your design plan, ensuring all pieces are uniform and fit together securely.
- Assembling the Base: Start by building the base of the rack, ensuring it is level and stable to support the weight during workouts.
- Adding Vertical Supports: Attach the vertical supports to the base, making sure they are perpendicular and securely fastened to handle the stress of lifting.
- Cross Supports: Install cross supports to enhance stability and prevent wobbling during use, ensuring they are at the correct height for barbell positioning.
- Safety Features: Incorporate safety features such as spotter arms or safety pins to catch the barbell in case of a lift failure.
- Finishing Touches: Sand down any rough edges and apply paint or a protective finish to prevent rust and ensure longevity.
- Testing the Rack: Once assembled, test the rack with lighter weights to ensure stability and safety before progressing to heavier lifts.
How Do You Ensure Proper Assembly for Stability?
Ensuring proper assembly for stability in a DIY power rack involves several key considerations:
- Use Quality Materials: Selecting durable and strong materials such as heavy-duty steel ensures that the structure can withstand heavy weights without bending or breaking. The gauge of the steel and the type of joints used play a significant role in the overall stability of the rack.
- Follow a Detailed Plan: Having a comprehensive assembly plan or blueprint that includes precise measurements and instructions allows for accurate construction. This minimizes the risk of misalignment, which could compromise stability and safety during use.
- Secure Fasteners: Utilizing high-quality bolts, nuts, and screws that are properly tightened is crucial for the integrity of the assembly. Regularly checking these fasteners for wear and ensuring they are snug can prevent accidents caused by loose parts.
- Add Stability Features: Incorporating features such as cross-bracing or additional support beams can enhance the overall stability of the rack. These elements help distribute weight more evenly and reduce wobbling, especially during heavy lifts.
- Level the Base: Ensuring that the base of the power rack is level and positioned on a stable surface is critical for overall stability. Uneven ground can cause the rack to shift or tip, which poses a safety risk when using weights.
- Test the Assembly: Before using the power rack for heavy lifting, performing a thorough stability test with lighter weights can help identify any potential weaknesses. This allows you to make necessary adjustments before putting the rack to full use.
Why Should You Consider Upgrading Your DIY Power Rack?
You should consider upgrading your DIY power rack to enhance safety, durability, and versatility in your workouts.
According to a study by the National Strength and Conditioning Association, the structural integrity and safety of exercise equipment play a critical role in injury prevention (NSCA, 2020). An upgraded power rack often features reinforced materials and improved design, which can significantly reduce the risk of accidents during heavy lifts.
The underlying mechanism for this increased safety and performance is rooted in the materials and engineering used in manufacturing. Upgrading your DIY power rack may involve transitioning from less durable materials, like wood or thin steel, to commercial-grade steel with a higher weight capacity. This shift not only improves the rack’s ability to withstand intense training sessions but also contributes to stability, allowing for better form during exercises. Furthermore, the addition of features like adjustable safety bars and pull-up attachments can enhance functionality, enabling a wider range of exercises and more efficient training routines.
As users engage in more complex lifts and routines, the need for a robust and adaptable setup becomes evident. A well-designed power rack allows for progressive overload, which is crucial for muscle growth and strength gains, as highlighted by research from the Journal of Strength and Conditioning Research (2019). Thus, upgrading your DIY power rack not only enhances safety but also supports your long-term fitness goals by providing a stable and effective training environment.
What Innovative Features Can You Add for Improved Performance?
Resistance Band Anchors increase the versatility of the rack by allowing users to incorporate resistance bands into their training. This feature is ideal for adding variable resistance to exercises, helping to improve strength and muscle growth over time.
A Powder Coating Finish not only makes the power rack visually appealing but also significantly prolongs its lifespan by providing a protective layer against scratches and corrosion. This is particularly important for equipment that will be exposed to sweat and moisture in a gym environment.
An Expandable Footprint feature ensures that the power rack can accommodate heavier weights by providing added stability. This design consideration helps prevent tipping or wobbling during intense lifting sessions, enhancing safety for the user.
Finally, an Integrated Cable System allows for a broader range of exercises, making the power rack multifunctional. This feature is perfect for users looking to diversify their workout routines by including cables for various strength training movements.
Related Post: