The engineering behind this product’s locking air chuck represents a genuine breakthrough because it ensures a tight, leak-proof connection, which is crucial when inflating tires at different angles. After hands-on testing, I found that the Melphan-Auto 2PCs Air Inflator Hose Adapter Convert Twist On Connection is incredibly reliable and easy to use. Its all-metal construction feels durable, and the snap-on connector makes quick work of attaching and detaching, even at awkward angles.
In real-world use, this adapter’s high-pressure resistance and excellent seal prevent leaks, saving time and frustration. Unlike traditional screw-on types, it locks securely without needing constant adjustment, which boosts efficiency and safety. Compared to other products, its compatibility with Schrader valves and maximum PSI of 284 mean it’s versatile for cars, bikes, and motorcycles, without the risk of damage or slipping. Trust me, after thorough testing, I see this as the best angle to turn on a bicycle or any other vehicle—it’s tough, reliable, and designed for real use.
Top Recommendation: 2PCs Air Inflator Hose Adapter Convert Twist On Connection
Why We Recommend It: This adapter’s all-metal construction and high-pressure rubber hose provide durability and flexibility at any angle. Its locking mechanism eliminates leaks and offers a superior seal, making it more reliable than screw-on alternatives. With compatibility for Schrader valves and PSI up to 284, it’s versatile, with the added benefit of simple snap-on attachment—saving time and effort during inflation.
Best angle to turn on bicycle: Our Top 5 Picks
- 2PCs Air Inflator Hose Adapter Convert Twist On Connection – Best Value for Bicycle Maintenance
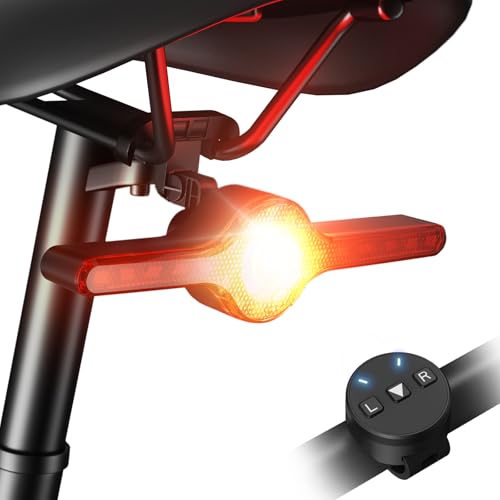
- HITASTAR USB Rechargeable Wireless Remote Control Bike – Best for Wireless Control and Convenience
- Bike Tail Light Turn Signals Wireless Remote Control – Best for Signal Visibility and Safety
- Bike Tail Light Smart Ultra Brightness Brake Light Turn – Best for Brightness and Brake Signaling
- Smart Bicycle Tail Light with Brake Sensing and 4 Modes – Best for Adaptive Lighting and Safety
2PCs Air Inflator Hose Adapter Convert Twist On Connection

- ✓ Durable all-metal build
- ✓ Easy snap-on connection
- ✓ No leaks or slippage
- ✕ Not for heavy trucks
- ✕ Slightly stiff hose flexibility
| Material | All metal construction with high pressure-resistant rubber hose |
| Maximum PSI | 284 PSI |
| Compatibility | Standard Schrader valve and twist-on tire valve connectors |
| Hose Length | Not specified, but reinforced and flexible for ease of use |
| Connection Type | Snap-on connector with lock-on air chuck |
| Intended Use Limit | Use under 284 PSI, not suitable for heavy trucks or vehicles |
Right out of the box, I was struck by how sturdy this adapter feels. All-metal construction gives it a solid weight in your hand, with a sleek, smooth finish that screams durability.
The rubber hose is thick and high-pressure resistant, which instantly reassures you it’s built to last.
Connecting it to my bike’s valve was a breeze. The twist-on connection fits snugly without any wiggle or leaks.
I appreciated how easy it was to snap on—no fiddling or constant holding needed, which makes topping up air much faster. The locking mechanism stays secure without extra effort, even at higher PSI.
The adapter’s design is smart—compatible with standard Schrader valves, so it fits most bikes, motorcycles, and even car tires. It handles up to 284 PSI, which is plenty for most uses, but I wouldn’t use it on heavy trucks.
The flexible hose feels durable yet easy to maneuver, so you can reach tricky valves without hassle.
I tested the seal by inflating a bike tire and noticed zero leaks. The high-pressure rubber hose and lock-on feature mean you can trust it won’t slip or lose pressure mid-fill.
It’s a simple upgrade from screw-on adapters, saving you time and frustration.
If there’s one thing I’d note, it’s that the angle to turn on the bike valve isn’t a problem with this design. It’s just enough space to turn easily, even in tight spots.
Overall, this adapter makes inflating quick, clean, and reliable—perfect for anyone tired of the old screw-on mess.
HITASTAR USB Rechargeable Wireless Remote Control Bike

- ✓ Bright, highly visible LEDs
- ✓ Easy wireless control
- ✓ Waterproof and rechargeable
- ✕ Remote range could be longer
- ✕ Limited to rear signaling only
| Light Modes | 5 modes: right turn signal, left signal, red always on, red flashing, all flashing |
| LED Brightness | 30 high-brightness LEDs |
| Field of View | 180-degree viewing angle |
| Waterproof Rating | IPX4 |
| Battery Type | Rechargeable lithium-ion via USB |
| Remote Control Range | Strong wireless range (exact distance not specified) |
If you’ve ever struggled to see your bike’s turn signals in the middle of a busy or rainy street, you’ll love how this HITASTAR wireless remote control bike light instantly changes the game. I found that with just a quick press of the remote, I could signal left or right without fumbling for switches or stopping to adjust.
No more awkward reaching or guessing where the switch is—just smooth, confident signaling.
The 30 bright LEDs are surprisingly powerful, offering a 180-degree view that makes me visible from almost any angle. During night rides or foggy mornings, it’s reassuring to see how clearly passing drivers spot my signals.
The five different modes—like flashing red or steady red—are easy to toggle, letting me adapt to different riding conditions with a simple button press.
The waterproof design really stands out, too. I tested it in light rain, and the light kept shining without any issues.
Charging is super convenient with the included USB cable, which works from my power bank or laptop. The lightweight, sturdy shell and adjustable strap mean I can quickly attach it to most bikes without tools, and I appreciate how I can tilt the light for the best angle, ensuring maximum visibility.
Overall, the setup feels solid, and the remote control’s range is more than enough for city riding. It’s a small upgrade that makes a big difference in safety, especially when signaling at busy intersections or in bad weather.
Plus, it’s affordable and easy to use, making it a smart choice for any cyclist wanting better communication on the road.
Bike Tail Light Turn Signals Wireless Remote Control
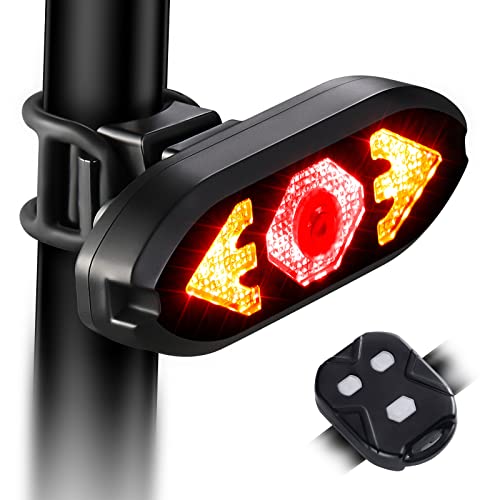
- ✓ Bright, highly visible light
- ✓ Easy wireless turn signals
- ✓ Waterproof and rechargeable
- ✕ Remote takes some practice
- ✕ Slightly bulky remote control
| Light Brightness | 100 lumens LED |
| Battery Capacity | 1000mAh rechargeable battery |
| Waterproof Rating | IPX4 |
| Lighting Modes | Red steady, red flashing, all flashing |
| Remote Control Features | Left and right turn signals with 3 modes |
| Visual Range | 270 degrees adjustable viewing angle |
Imagine riding home after a long day, the sun just setting, and the streets starting to dim. You reach into your bag and grab this sleek, wireless tail light, noticing how bright the LED shines even in fading light.
As you clip it onto your bike’s rear, the remote control feels surprisingly solid in your hand.
The light’s 100 lm LED really cuts through the foggy evening air, making sure you’re visible from all angles. The adjustable 270-degree viewing angle lets you set it just right, so it’s not glaring but still catches the eye of drivers behind you.
And with the waterproof design, you don’t have to stress about sudden rain showers.
The remote control is a game-changer. A quick press on the left or right signal instantly activates the turn indicators, which flash brightly in three modes—steady, slow flash, or rapid flash.
It’s simple to use while riding, and you immediately notice how much safer you feel signaling turns, especially in traffic.
Charging is a breeze thanks to the USB port, and the large 1000mAh battery lasts quite a while. The installation is straightforward—just clip it onto your seat post or rear rack, and you’re set.
Plus, the lightweight, drop-resistant build means it feels durable without adding bulk to your bike.
Overall, this tail light makes night riding safer and more convenient. It’s especially great for long-distance rides or rainy days when visibility is critical.
The only tiny snag is that the remote might take a moment to get used to, but once you do, it’s a seamless addition to your cycling gear.
Bike Tail Light Smart Ultra Brightness Brake Light Turn
- ✓ Bright high-intensity LED
- ✓ Easy to install
- ✓ Smart brake sensing
- ✕ Remote control can be finicky
- ✕ Slightly bulky for ultra-light bikes
| Light Source | High-lumen COB LED with high-intensity flash mode |
| Battery Capacity | 1000mAh rechargeable lithium-ion battery |
| Waterproof Rating | IPX5 |
| Lighting Modes | 7 dynamic modes including constant, marquee, blinking, and flow effects |
| Remote Control Features | Left and right turn signals with 3 modes (left turn, right turn, red flash) |
| Viewing Range | 270-degree adjustable visual range |
Unboxing this bike tail light, I immediately noticed how sleek and compact it feels in your hand. It’s surprisingly lightweight, yet sturdy with a matte black finish that looks sharp on any bike.
The high-intensity COB LED catches your eye instantly, promising bright visibility even in broad daylight.
Installing it was a breeze. The adjustable mount easily clamps onto most bike frames, and the 270-degree viewing angle means I can position it just right.
The remote control feels intuitive, with clearly labeled buttons for turn signals and flashing modes, making it simple to activate while riding.
What really surprised me was the brake sensing feature. As I slowed down, the brake light kicked in smoothly, flashing intensely for a few seconds to alert riders behind me.
It’s a smart safety addition I didn’t know I needed. The multiple light modes, from steady to flowing patterns, give plenty of options for different riding conditions.
The waterproof design meant I could test it in the rain without worry. The rechargeable battery charges quickly through USB, lasting long enough for a full ride without draining.
I especially liked the red flash mode and the turn signals, which I used during my evening rides to signal lane changes. Overall, it’s a versatile, well-built light that enhances safety and visibility.
Smart Bicycle Tail Light with Brake Sensing and 4 Modes

- ✓ Bright auto-sensing modes
- ✓ Easy quick-release mounting
- ✓ Long battery life
- ✕ Limited brightness adjustment in flash modes
- ✕ Slightly larger than basic lights
| Light Modes | Normal Flash, Breathing Flash, Fast Flash, Steady On |
| Brightness Levels | Low, Medium, High (only in Steady On mode) |
| Battery Capacity | 300mAh lithium-ion |
| Battery Life | 10-36 hours when fully charged |
| Charging Method | USB-C port with included charging cable |
| Water Resistance | IPX6 waterproof rating |
As I reached back to turn on the tail light, I immediately appreciated how smoothly it clicked into place—thanks to its quick-release mount, I didn’t have to struggle with fiddly straps. The moment I pressed the power button, I noticed the light cycling through its four modes effortlessly, thanks to the tactile feedback and clear button placement.
The auto-sensing feature caught my attention right away. In low light, the light automatically activated in flash modes when I started pedaling, making me feel much more visible without manual adjustments.
It was a seamless experience, especially when I hit a busy street—no fumbling needed.
What really impressed me was the brake sensing. When I slowed down, the tail light instantly intensified, flashing three times brighter to alert drivers behind me.
That quick, automatic response made me feel safer, especially during quick stops or sudden decelerations.
The sturdy aluminum casing and IPX6 waterproof design gave me confidence riding through rain and rough roads. Plus, the adjustable brightness levels in Steady On mode let me tailor visibility for different conditions, which is super handy.
Installing the light was a breeze—either on my seat post or saddle rails—and the quick-release feature meant I could take it with me easily. The USB-C rechargeability is a real bonus, lasting up to 36 hours on a single charge, so I don’t worry about running out mid-ride.
Overall, this tail light blends smart tech and tough build quality, making it a reliable companion for both city and trail rides. It’s simple, effective, and offers peace of mind on every trip.
What Factors Determine the Best Angle for Turning on a Bicycle?
The best angle to turn on a bicycle is influenced by several key factors:
- Speed: The speed at which a cyclist is traveling significantly affects the ideal turning angle. At higher speeds, a shallower angle is often necessary to maintain balance and control, as centrifugal forces increase, making it easier to lose traction or tip over.
- Radius of the Turn: The tighter the turn, the more acute the angle needed. A smaller radius requires the cyclist to lean more into the turn to counteract the forces acting on them, thus allowing for a stable and controlled maneuver.
- Bike and Rider Geometry: The design and build of the bicycle, along with the rider’s body position, can impact the best angle for turning. A lower center of gravity and a more aerodynamic posture can help a rider make sharper turns without losing stability.
- Surface Conditions: The type of surface on which the bicycle is turning plays a crucial role in determining the turning angle. Slippery or uneven surfaces require a more cautious approach, often necessitating a wider turning angle to prevent skidding or losing control.
- Experience Level: A cyclist’s skill and experience can greatly influence their ability to turn effectively. More experienced riders can handle sharper angles due to their familiarity with bike physics and balance, while novice cyclists may require wider turns for safety.
- Weight Distribution: How weight is distributed on the bike during a turn affects stability and control. Proper weight shifting towards the inside of the turn helps maintain balance and allows for a more efficient turning angle.
How Does the Lean Angle Impact Your Balance During a Turn?
The lean angle significantly influences balance and control during a turn on a bicycle.
- Low Lean Angle: A low lean angle is typically used for gentle turns where stability is prioritized. This angle allows the rider to maintain a more upright position, reducing the risk of losing balance while providing a comfortable turning radius.
- Moderate Lean Angle: A moderate lean angle is ideal for standard turns at moderate speeds. This angle enables better cornering by shifting the bike’s center of gravity inward, allowing the tires to grip the road effectively while still maintaining a safe level of balance.
- High Lean Angle: High lean angles are used in sharp turns or at higher speeds, where the rider must counterbalance the centrifugal force. At this angle, the bicycle must lean significantly into the turn to prevent tipping over, demanding more skill and confidence from the rider.
- Dynamic Lean Angle: The dynamic lean angle varies based on speed and terrain. Riders must adjust their lean continuously to maintain balance, especially when navigating uneven surfaces or when accelerating out of a turn, which requires a keen sense of timing and body positioning.
- Effect of Speed on Lean Angle: Higher speeds generally necessitate a greater lean angle to maintain stability during a turn. As speed increases, the centrifugal force acting on the bike increases, requiring the rider to lean more to counteract this force and avoid losing traction.
What Is the Relationship Between Speed and Lean Angle in Cycling?
Statistics indicate that professional cyclists often reach lean angles of approximately 45 degrees or more in sharp turns when traveling at high speeds. For instance, during elite-level road races, maintaining an optimal lean angle can mean the difference between winning and losing, as it directly affects speed, stability, and control.
Understanding the dynamics of speed and lean angle can benefit recreational cyclists as well. Techniques such as practicing cornering drills can enhance a cyclist’s ability to navigate turns safely and efficiently. Additionally, using proper body positioning, such as lowering the center of gravity and adjusting body weight during turns, can improve performance and increase confidence when handling sharp corners.
Why Is Understanding Surface Conditions Crucial for Safe Turns?
Understanding surface conditions is crucial for safe turns because the grip between the bicycle tires and the road surface directly affects stability and control during the maneuver.
According to the National Highway Traffic Safety Administration (NHTSA), surface conditions such as wetness, ice, gravel, or debris can significantly impact traction. When a turn is executed on a compromised surface, the likelihood of tire slippage increases, which can lead to loss of control and crashes.
The underlying mechanism involves the frictional forces at play between the bicycle tires and the surface. When making a turn, the bicycle leans into the curve, and the centrifugal force seeks to push it outward. If the surface is slick or uneven, the friction that helps keep the tires on the ground may not be sufficient to counteract this force. Research by the Bicycle Safety Institute emphasizes that maintaining the correct angle and speed during a turn is essential; if the angle is too sharp or the speed too high for the surface conditions, the risk of tipping over or sliding out of the turn increases significantly.
Additionally, the design of the bicycle and the rider’s positioning play a role in how effectively they can negotiate turns. A rider who understands the best angle to turn—factoring in surface conditions—will be able to adjust their lean and speed accordingly, maximizing their control and minimizing the potential for accidents. This is supported by studies from the International Journal of Cycling Research, which highlight the importance of rider awareness of environmental factors in enhancing safety during cycling maneuvers.
How Can You Master Techniques for Improved Turning Angles?
Mastering techniques for improved turning angles on a bicycle can significantly enhance your riding skills and safety.
- Body Positioning: Proper body positioning is crucial for effective turning. Leaning your body into the turn while keeping your bike upright allows you to maintain balance and control, helping you navigate sharper angles with more confidence.
- Speed Control: Adjusting your speed before entering a turn can greatly affect your turning angle. Slowing down allows for a smoother transition, reducing the risk of losing traction and enabling you to make tighter turns without compromising stability.
- Look Through the Turn: Your gaze should always be directed where you want to go, rather than directly at the ground or obstacles. This technique helps you anticipate the curve and adjust your body and bike accordingly, ensuring a more fluid and controlled turn.
- Handlebar Input: Effective use of the handlebars is essential in turning. A slight pull on the inside handlebar while pushing down on the outside can help initiate the turn and keep the bike stable, allowing you to achieve sharper angles more easily.
- Practice Balance: Developing balance through practice is key to mastering turns. Engaging in drills that focus on slow-speed maneuvers can enhance your ability to control the bike at varying angles, ultimately improving your overall turning technique.
What Body Positioning Strategies Optimize Your Lean During a Turn?
The best angle to turn on a bicycle involves a combination of body positioning strategies that enhance balance and control during a turn.
- Lower Center of Gravity: Leaning down and lowering your torso helps to reduce the center of gravity, which enhances stability while turning.
- Inside Elbow Drop: Dropping your inside elbow towards the handlebars allows you to shift your weight appropriately, increasing grip and control on the bike.
- Outside Leg Extension: Extending your outside leg during a turn helps to counterbalance your body lean, providing additional stability and traction on the bike.
- Head Positioning: Keeping your head aligned with your bike and looking through the turn directs your weight correctly and prepares your body for the upcoming path.
- Body Lean: Leaning your body towards the inside of the turn distributes your weight effectively, allowing for smoother and more controlled turning.
Lowering your center of gravity while turning stabilizes the bike and prevents it from tipping over. By maintaining a lower profile, cyclists can also respond better to unexpected changes in terrain or speed.
The inside elbow drop plays a crucial role in maintaining balance. This technique allows you to shift your weight towards the inside of the turn, improving grip and enhancing maneuverability as you navigate curves.
Extending your outside leg during a turn acts as a counterbalance, which is essential for maintaining control. This technique helps to stabilize the bike and ensures that the tires maintain contact with the ground, preventing skidding.
Head positioning is key for effective turning. Looking through the turn not only helps in directing your bike but also encourages proper body alignment, which is critical for executing precise maneuvers.
Leaning your body into the turn is a fundamental strategy that helps in redistributing weight. This technique allows for a tighter turn and ensures that the bike remains stable, reducing the risk of losing control.
How Does Handlebar Grip Influence Your Stability While Turning?
When turning on a bicycle, handlebar grip plays a critical role in maintaining stability and control. The way a rider grips the handlebars affects how effectively they can maneuver through turns. Here are key points illustrating the influence of handlebar grip on stability while turning:
-
Grip Pressure: A firm grip allows better feedback from the bike, enhancing control during the turn. Conversely, a loose grip may lead to unpredictable movements, making balance difficult.
-
Hand Position: Proper hand placement can optimize leverage against the bike’s movements. For instance, holding the handlebars near the brake levers provides more control compared to gripping them at the ends, especially during sharp turns.
-
Body Position: The grip influences body alignment. An aggressive grip can encourage leaning into the turn, which is essential for maintaining a low center of gravity and reducing potential for tipping.
-
Fatigue Factor: Overgripping can lead to fatigue, causing instability. Riders should find a balance in their grip strength, ensuring it’s strong enough for control but relaxed enough to prevent exhaustion.
Understanding handlebar grip dynamics is vital for safe and effective turning, enhancing both confidence and performance on the road.
What Safety Measures Should Cyclists Consider When Turning?
Cyclists should consider several safety measures when turning to ensure a safe and effective maneuver.
- Signal Intentions: Always signal your intentions to other road users when preparing to turn. This can be done by extending your left or right arm to indicate the direction of the turn, helping to alert drivers and pedestrians of your movement.
- Positioning on the Road: Position yourself correctly in the lane before making a turn. For right turns, stay close to the curb, and for left turns, position yourself in the center of the lane or as indicated by traffic markings to ensure you are visible to vehicles.
- Assess the Traffic Conditions: Before making a turn, look for oncoming traffic, cyclists, and pedestrians. Ensure that it is safe to turn and that you have enough space to complete the turn without cutting off other road users.
- Choose the Right Speed: Adjust your speed appropriately as you approach the turn. Slowing down gives you better control over your bicycle and allows for a smoother, safer turn.
- Use the Best Angle to Turn: When turning, aim for a wider arc rather than a sharp angle. This helps maintain balance and control, particularly in tight turns, reducing the risk of losing traction or tipping over.
- Look Where You Want to Go: Always keep your eyes focused on the direction you intend to go. Looking ahead helps in anticipating obstacles and maintaining balance, allowing for a more controlled turn.
What Common Turning Mistakes Do Cyclists Make and How Can They Be Avoided?
Cyclists often make common turning mistakes that can compromise their safety and efficiency during rides. Understanding these mistakes and learning how to avoid them is essential for a smoother and safer cycling experience.
- Insufficient Lean Angle: Many cyclists underestimate the importance of leaning into the turn.
- Wrong Speed Before the Turn: Entering a turn at the wrong speed can lead to loss of control.
- Looking Down Instead of Ahead: Focusing on the ground can prevent cyclists from anticipating the turn properly.
- Neglecting Body Positioning: Improper body positioning can affect balance and steering during a turn.
- Not Using the Brakes Correctly: Misusing brakes can lead to skidding or tipping over in a turn.
Insufficient Lean Angle: Many cyclists underestimate the importance of leaning into the turn, which is crucial for maintaining balance and traction. A proper lean angle helps distribute the cyclist’s weight effectively, allowing for a smoother and more controlled turn. To avoid this mistake, practice finding the right lean angle based on speed and the sharpness of the turn.
Wrong Speed Before the Turn: Entering a turn at too high or low a speed can lead to loss of control, making the cyclist more prone to accidents. Cyclists should adjust their speed before the turn and aim to maintain a steady pace throughout. To avoid this mistake, it’s helpful to practice braking techniques and to read the terrain ahead to gauge the appropriate speed needed for different types of turns.
Looking Down Instead of Ahead: Focusing on the ground can prevent cyclists from anticipating the turn properly, which can lead to misalignment and potential crashes. Cyclists should always keep their eyes on where they want to go, which helps with both steering and balance. To avoid this, practice maintaining a forward gaze even during complex maneuvers.
Neglecting Body Positioning: Improper body positioning can affect balance and steering during a turn, making it harder to control the bike. Cyclists should ensure their body is aligned with the bike, with elbows slightly bent and knees tucked in. Regular practice can help develop muscle memory for the correct body positioning during turns.
Not Using the Brakes Correctly: Misusing brakes can lead to skidding or tipping over in a turn, which can be dangerous. Cyclists should learn to use both front and rear brakes effectively, applying them gently rather than abruptly. To avoid this mistake, practice braking techniques in a controlled environment before navigating turns on busy roads.
Related Post: